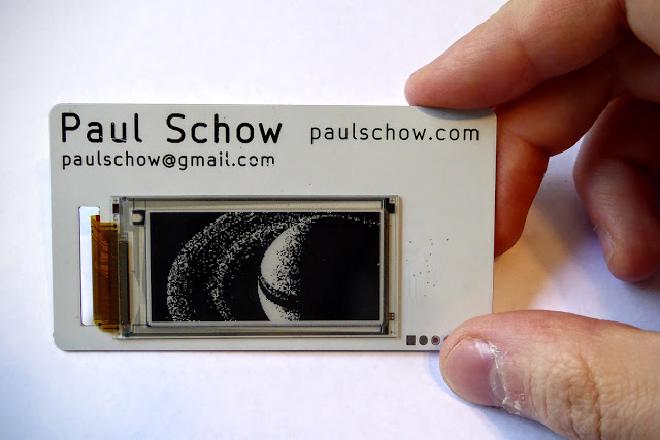
Epaper Business Card
Recently, after graduating with a EE degree from the University of Colorado Colorado Springs and working at X-IO for a few months, I found myself out of a job. This gave me plenty of time to work on projects! (Update: I have a full-time position now!)
I realized that it might be nice to have business cards. The problem with normal (paper) business cards is that once I got hired they would all be obsolete. The solution: use epaper to have a business card you can program with new information at any time!
Obviously this isn’t actually a very practical solution. However, I am a big fan of “usefulness optional” projects. Even if the end result is too expensive to actually hand out to anyone, it’s still a neat learning exercise for fit-to-envelope and ultra-low-power design.
I decided on a few things that I wanted my design to have:
- Epaper display
- Size of a business card
- No on/off switch
- Components only on the back of the board
- All surface mount components
- Powered by a thin coin cell battery
- Press button to switch between two images
Component Selection #
At my previous job I had messed around with the possibility of using epaper for a front-panel display that would keep information when the power went out. That never went into the product, but I did have some time to mess around with Pervasive Displays ePaper and discovered they have extensive open documentation, software, and hardware at their RePaper website.
More specifically, they have examples for the TI Energia Launchpad platform. This platform is great because you can use almost Arduino code with the TI MSP430 line of microcontrollers. I had previously used the TI MSP430G2553 Lauchpad in school to do a variety of tasks. The major advantages of using the MSP430 over an ATmega328 in this project is that the MSP430 has a built-in oscillator, lower price, and has ultra-low power modes.

Ultra-low power is very important here. In Low-power mode four (LPM4), the MSP430G2553 uses only 0.1 μA (100 nA). With a CR2032 battery that has 220 mAh, that’s an estimated battery life of 251 years!
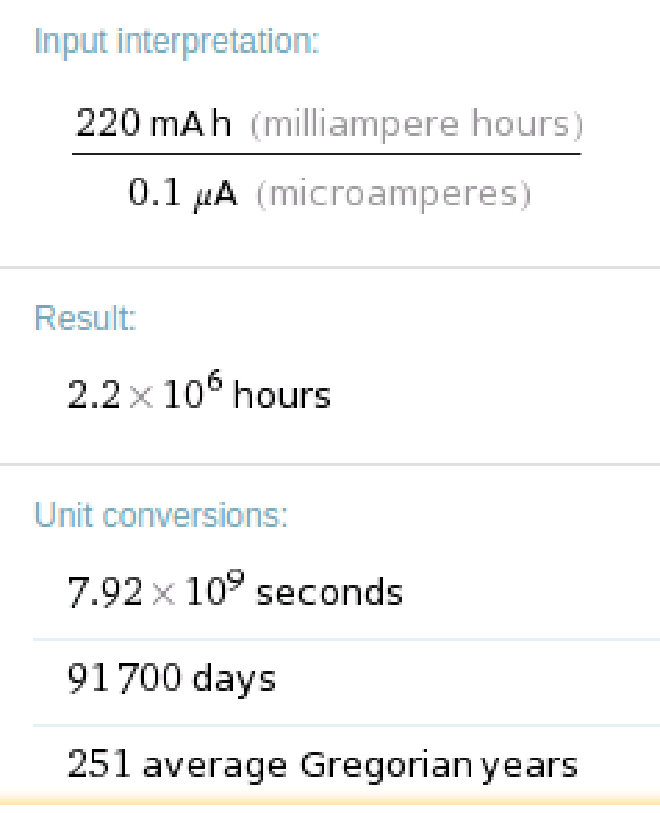
Now, a CR2032 battery won’t actually have a lifespan of 251 years, but it’s still pretty good.
If you are interested in epaper projects with Arduino, check out Wyolum’s BADGEr, it’s a very cool conference badge with a 2.71" display, Arduino, and an sd card.
I also chose the 2" epaper display because a 2.71" display will fit on a business card, but the RePaper example code can’t fit two 2.71" images on the MSP430G2553. Also, the 2" display is $15 while the 2.71" is $25.
That’s all the major component selection. Otherwise it’s mostly passives, which I just used cheapest and thinnest 0805 components I could find. There’s a bill of materials at the end of this post.
Component summary:
- TI MSP430G2553
- 2" epaper display
- CR2032 battery
Version 1 #
The first version of this design actually had two purposes. First, to do the whole epaper business card thing. Second, to see how fast I could design the board.
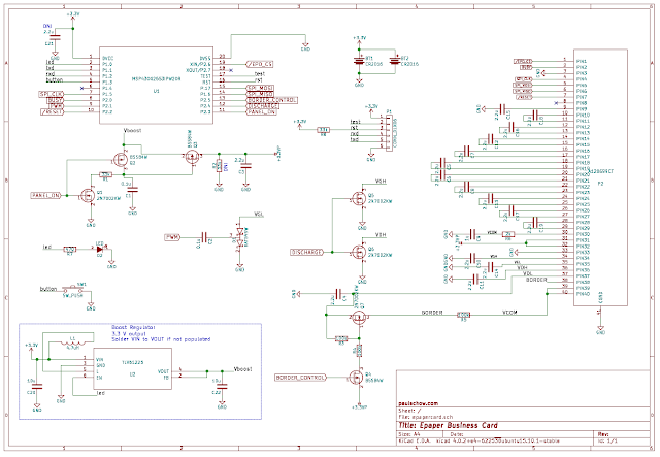
To start, I looked at the reference circuit for the epaper demo boards.
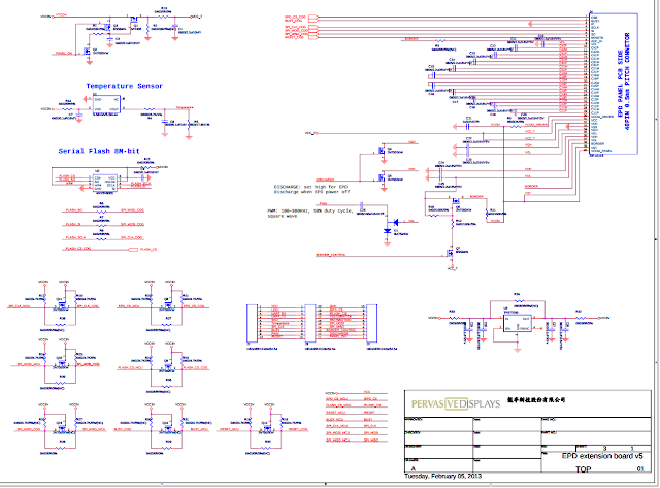
The first step is to decide what I can get rid of. All of the level shifters can go, because the MSP430 and the display are both 3.3v logic. Also, the serial flash and the temperature sensor can both go, along with the voltage regulator.
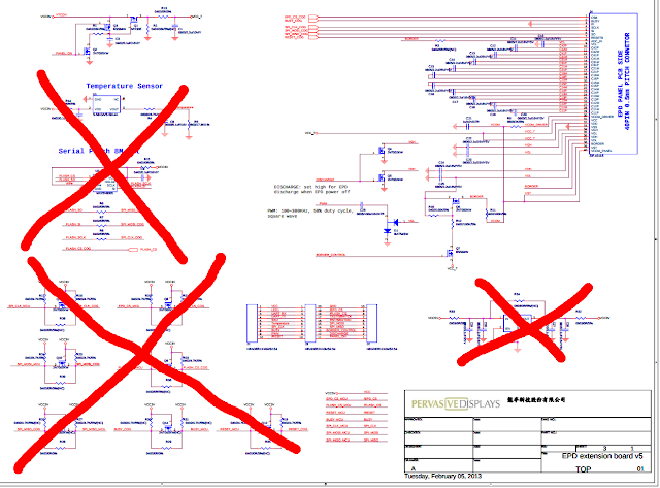
This leaves the circuit at basically nothing, which is just how I want it. All that’s left is power control circuitry, the 40-pin connector, and a bunch of capacitors and resistors. The only other circuits are a LED and a pushbutton connected to the MSP430.
I’m not going to show a screenshot of the schematic at this point, because I had to make some changes later.
Although I had most recently used Mentor Graphics Xpedition and EagleCAD for schematic capture and PCB layout, I decided to go with KiCad for this project. KiCad recently released a new stable version and it had been a few years since I had used it at all, so I was excited to see the changes. KiCad version 4 is great, and the OpenGL interactive router is amazing.
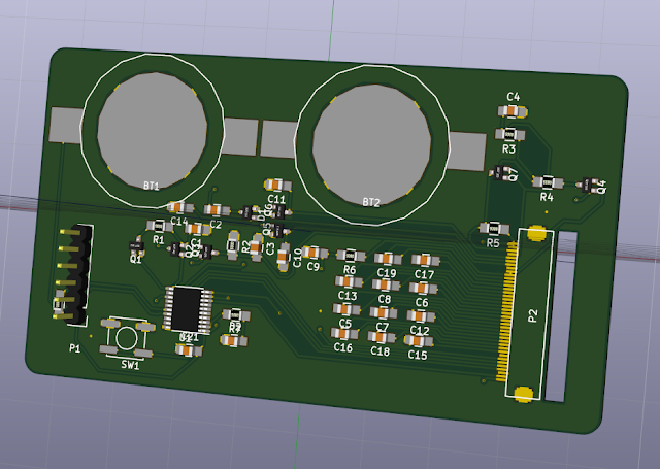
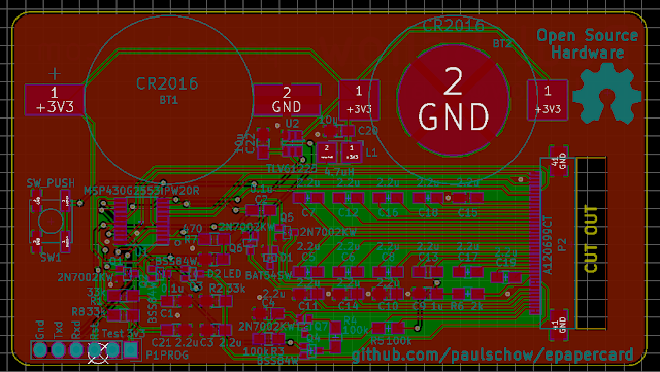
I ended up putting in two battery holders because I had room. The programming header is rendered as a through-hole pin header, but I wasn’t actually going to populate pins.
Keep in mind I made this whole board in a few hours around midnight, and checked it the next morning. Looked good enough to me though, so I ordered it!
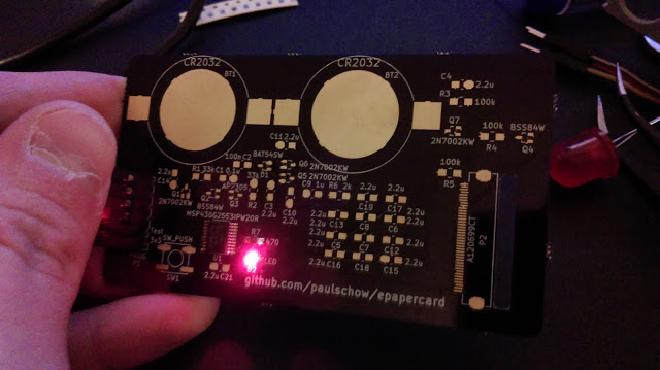
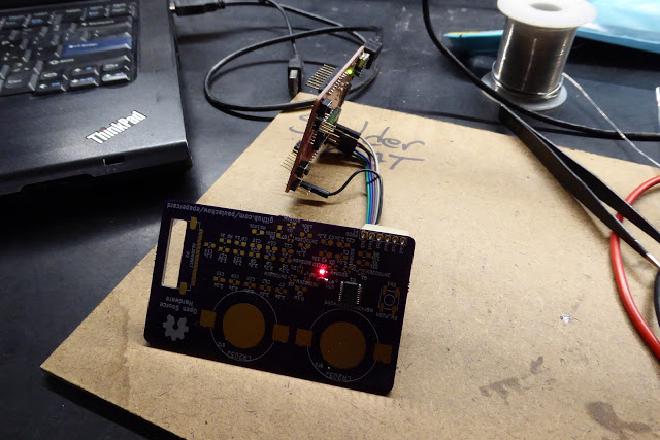
The basic verification worked. I put on an MSP430 and and LED, and I made the LED blink! Not exactly a challenging task, but it’s always exciting. My programming header worked too. It’s easy enough to program using the MSP430 Launchpad with some jumper wires on the programming pins.
However, I learned my lesson in rushed circuit boards. I got the 40-pin epaper connector totally backwards. I based my pin assignments on the connector, which on the development board has an arrow pointing to pin 40 instead of pin 1. This isn’t the only misleading connector on the board, but a few minutes with a multimeter would have saved my first prototype.
I also made some silly silkscreen mistakes (two capacitors, one labeled 100nF and one labeled 0.1uF). Also, that 40-pin connector is a huge pain to solder without a microscope. On to version two.
Programming #
Somehow I ended up with three of the MSP430 Launchpads, so I designed this board to be programmed by just taking the programming headers off one of those. Any Spy-Bi-Wire programmer should work though.
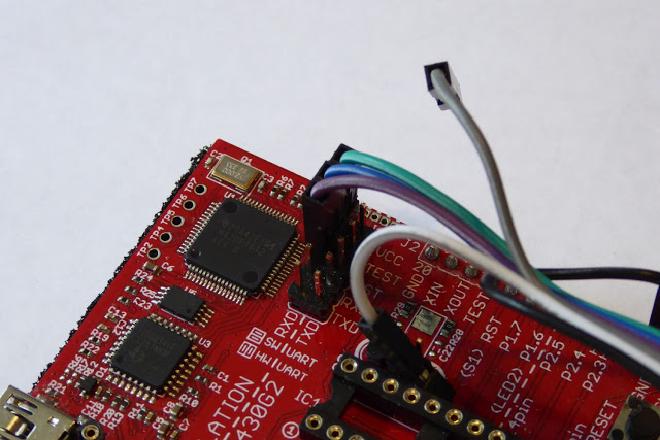
The only pins needed are VCC, TEST, RST, and GND. RX and TX are used for serial connection, but I never actually used them.
Holding the programming pins in the board works well, but if I was going to be making a bunch of these I would build a Sparkfun-style PogoBed programmer.
Version 2 #
All I need to do is reverse the 40-pin connector. Easy, right?
Okay, this took a bit of time to fix. I also spent even more time making it symmetrical.
Other than that, I fixed some silk mistakes, moved the programming header, and a bunch more aesthetic changes.
I also found out that TinkerMill - The Longmont Makerspace has a microscope!
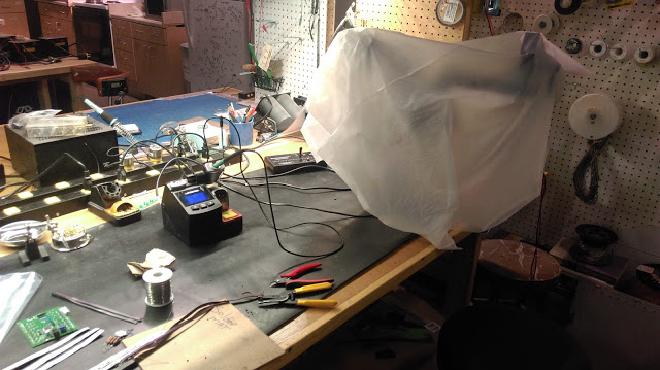
I’m not saying you have to use a microscope to solder on that 40-pin connector, but after using them at work and at school, it’s a lot easier for me to.
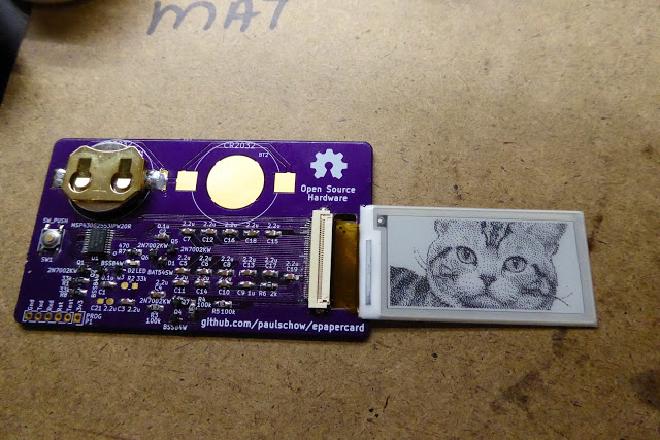
Even better, this time everything worked! The demo program from RePaper ran great, and the display switched images just like it should. It also ran off a single CR2032 battery.
I picked up some cheap generic double-sided tape to use to attach the display, but I’m sure there’s something better I should be using.
Firmware #
Now I had to take a closer look at the software.
The included RePaper demo.ino code was my starting point. This code loads in two images in the .xbm format, and switches between them every five seconds. I “just” needed to modify the code to only switch when the button was pressed, and be in low-power mode (LPM4) the rest of the time.
Much like the schematic example above, I started by taking out everything I didn’t need. This included all the code for the temperature sensor, eeprom, and serial output. Technically you should change the update rate of the epaper display depending on the ambient temperature (to update slower at lower temperatures) and the MSP430G2553 does have a built-in temperature sensor, but I just set it to always be 40° C for the fastest update rate.
LMP4 is actually pretty simple in Energia. I originally started using the basic C and setting all the power and interrupt registers, but that’s not even necessary.
All you really need to do in Energia is:
- Attach the interrupt to a button
- Put suspend() when you want LPM4
- Make an interrupt service routine (ISR) that wakes it up
It’s really that simple. My code looks something like this:
Of course, this took me a few days to figure out. Hopefully someone else doing this will find my post helpful. The complete source code is on my Github.
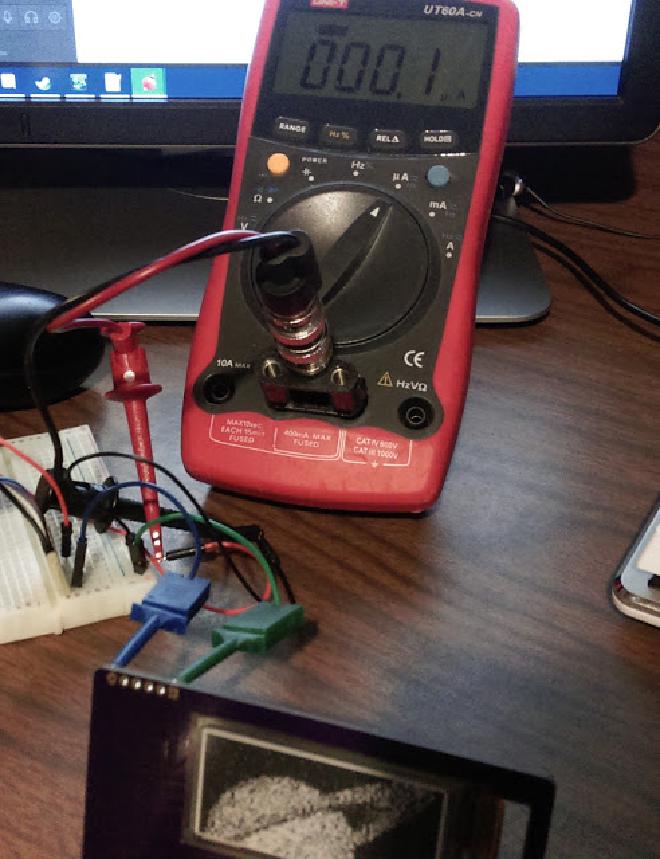
When I tested the standby current consumption, it came out to 0.1 uA! However, that’s the lowest current my meter can even measure.
The other big problem I ran into was when I tried to upgrade displays. The 2" E1200CS021-ND display on digikey is a newer version, so it uses the EPD_V231_G2.h library. When I ran this, I was getting a weird problem where after the image had been displayed, the display would dim. To solve this, I spent a while comparing the libraries.
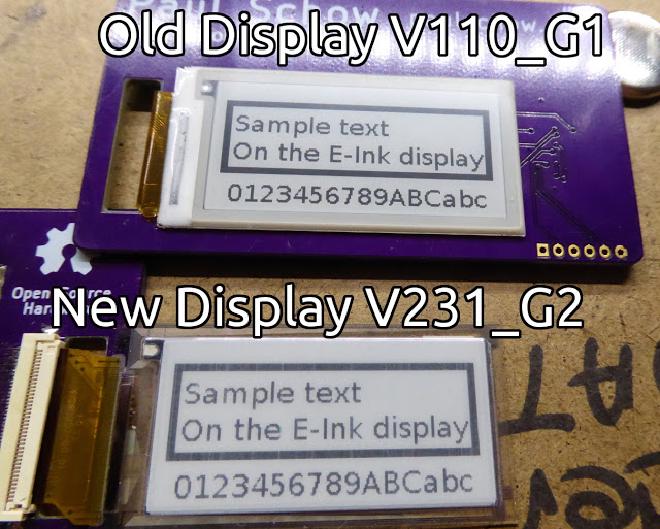
Eventually I noticed that the EPD_V110_G1 library (for the older display) included some extra SPI commands to discharge the display at the end.
I added those commands to EPD_V231_G2.cpp and it worked! I’m not sure if this is a problem that all displays will have, being that I only tested it on the single display I have. Also, I think that this dimming problem might only occur at voltages below 3.3V.
My modified libraries are on github:
https://github.com/paulschow/epapercard/tree/master/libraries
The libraries come with one picture of saturn, but I added two more. Gimp can easily convert a 200x96 image to the .xbm format required. In the “real” business card application I might put resume or portfolio information on the display.
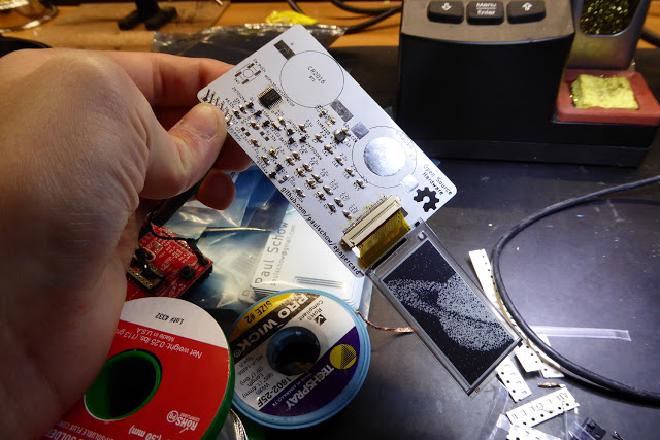
Version 3 #
Now that the proof of concept was done, I wanted to finish everything up with a final version. Version 3 is basically the same as version 2, but with some changes.
I changed the battery from a CR2032 (20mm diameter by 3.2mm tall) to a CR2016 (20mm diameter by 1.6mm tall). The CR2016 is the thinnest coin cell battery sold on digikey, which works for me. This does lower the standby battery life.
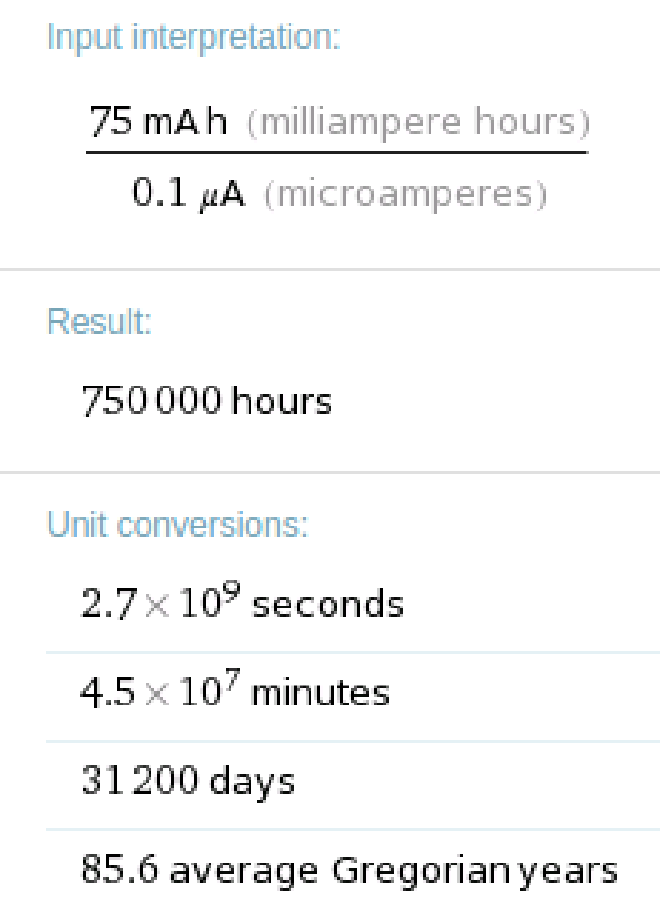
85.6 years standby battery life is still far over the estimated life of the battery, so I think it’ll be fine.
I decided to add pads for a tabbed solder-on CR2016, which is even thinner than a CR2016 in a battery holder.
While trying to fix the dimming display problem, I figured out that the epaper displays will only run down to about 2.6 V. CR2016 batteries will die around 2 V, and the MSP430 will run down to 1.8 V. To prevent possible problems with battery voltage, I decided to put in a boost converter. I picked the TLV61225DCKR, which will boost to 3.3 V from as low as 0.7 V. The idea is that the MSP430 will activate the boost converter before changing the image, to make sure the screen always gets 3.3 V.
The boost converter is entirely optional, and the TLV61225 has the Vin and Vout pads right next to each other, so if it’s not populated it’s easy to just connect the screen directly to the battery voltage.
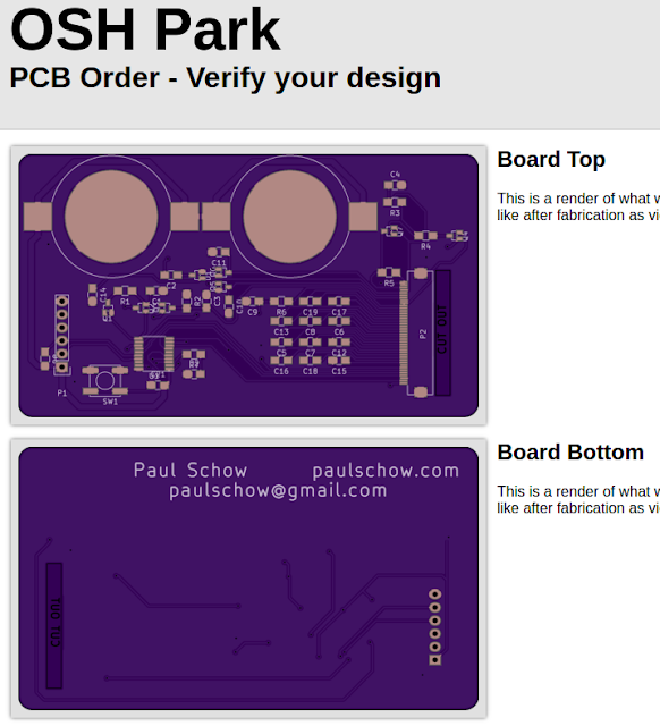
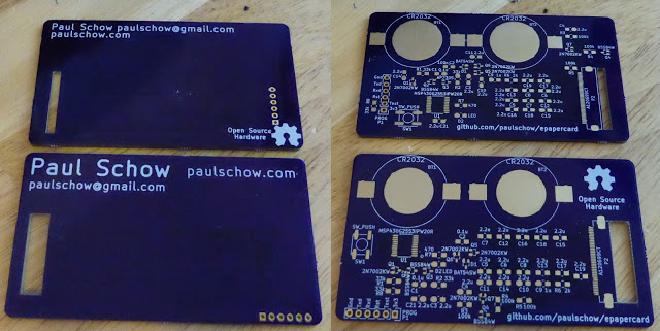
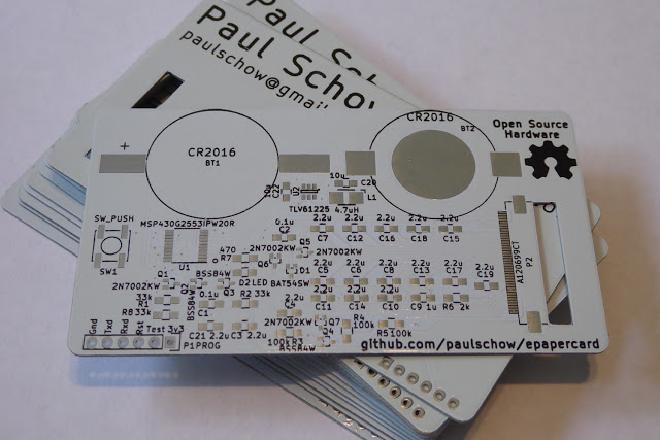
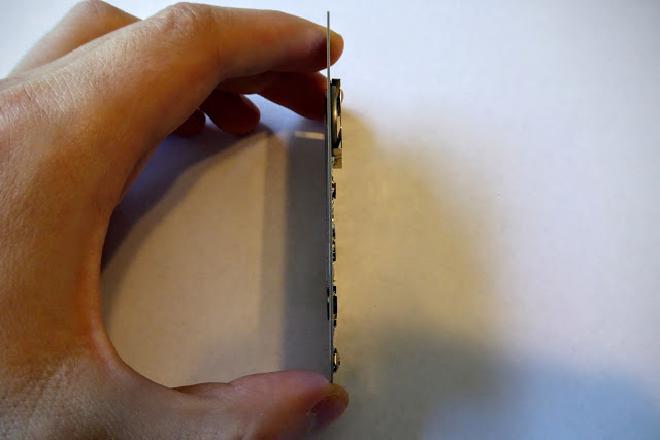
Since this was the final “production” run, I wanted to go all out. For the first two versions I ordered my boards from OSH Park, which is great. However, their boards are 1.6mm thick. They also offer a 0.8mm thick run, with a longer wait time.
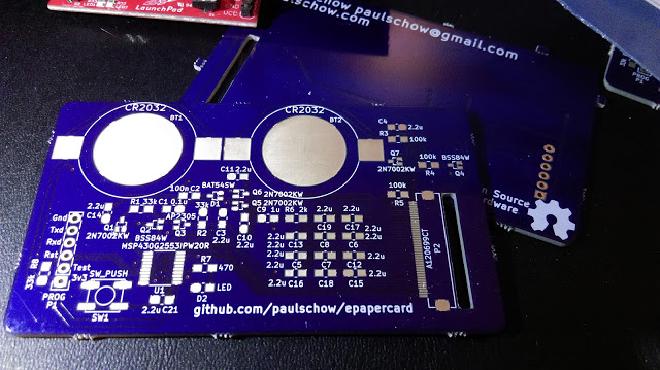
Someone at The Amp Hour Denver meetup had shown me their boards from Elecrow. Elecrow has a variety of board thicknesses and silkscreen colors, exactly what I wanted. I ended up ordering 10 of the 0.6mm thick boards, with black silk on white board.
Elecrow charges per set sizes. A standard business card is 3.5" by 2", which is 88.9mm by 50.8mm. I ended up taking 0.8mm off the height of the size to fit it in the 100mm by 50mm Elecrow size.
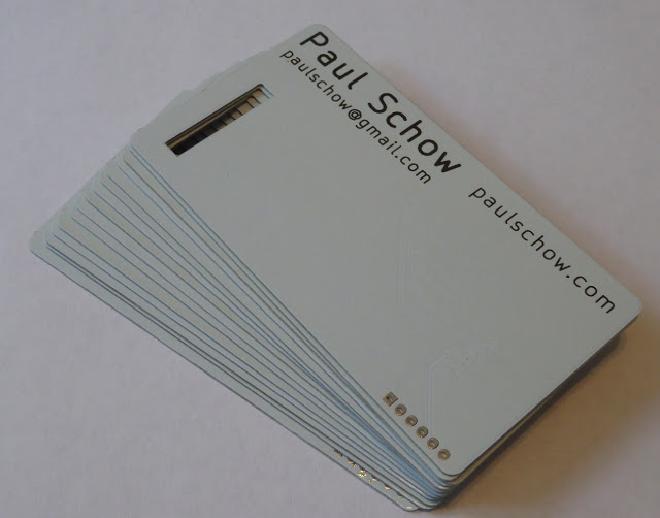
Elecrow sent me 15 boards! The price with shipping was $19.24, so that’s $1.28 per board. At that price, it’s almost practical to hand out the blank boards as “normal” business cards.
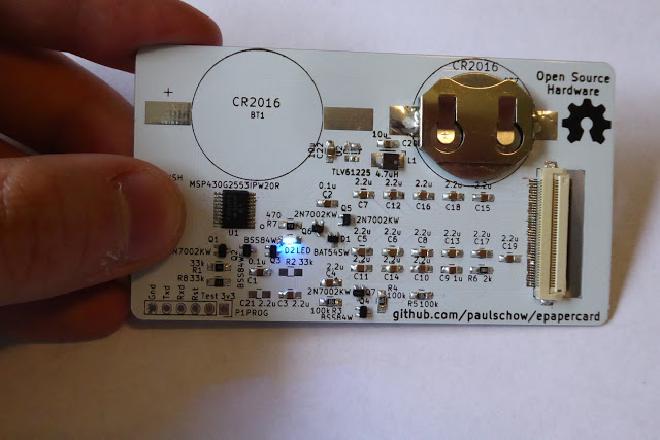
I headed back to Tinkermill to solder these up. To no one’s surprise, I made another small mistake. I reversed pin 4 and 6 on the boost regulator. Luckily I planned for that and just bypassed the boost regulator completely.
Apart from the nonworking boost regulator, everything else worked!
View on Youtube
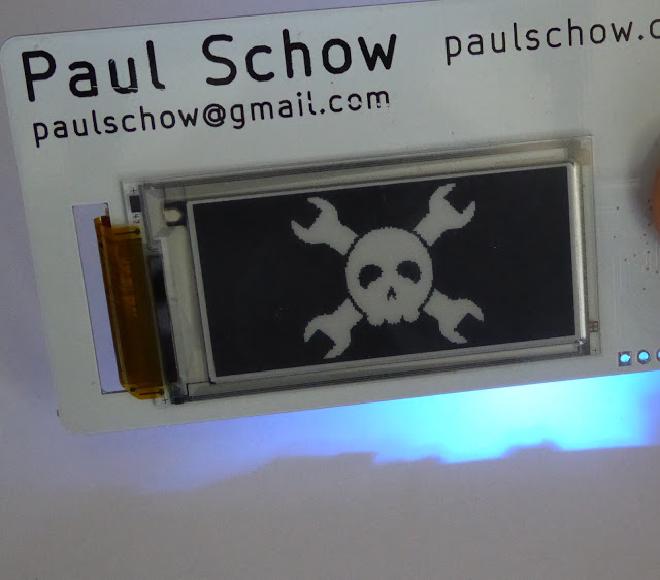
I put the Hackaday jolly wrencher on the card for extra blog cred.
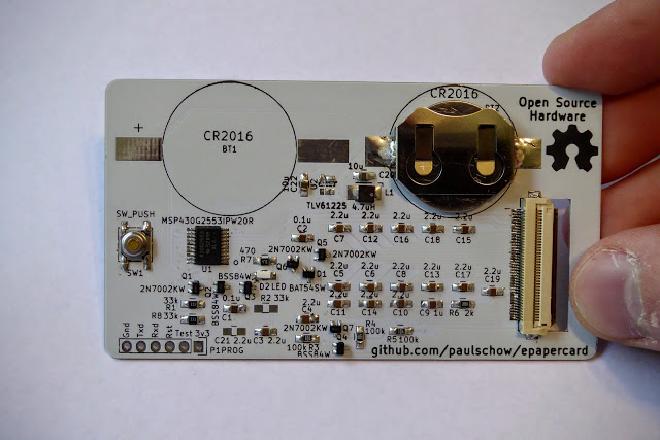
The thickest part on there is still the CR2016 battery holder, but using the CR2016 with tabs would make it even thinner.
A right-angle blue LED makes it so there’s a blue light on the surface when the image is being changed, and looks pretty cool.
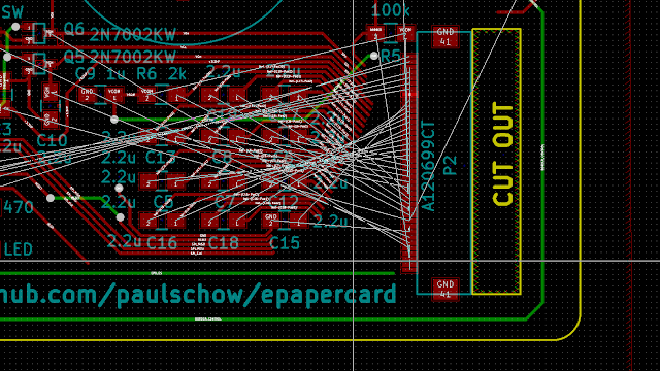
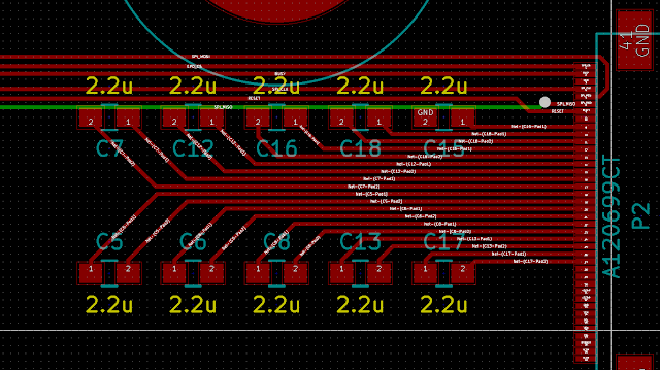
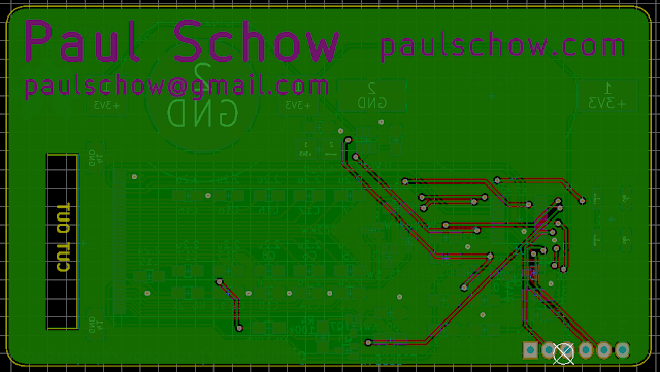
Layout and Schematic #
For the complete files, see my Github. I did fix the problem with the boost regulator.
Budget #
After posting my "$25" Satellite Tracker, I got a lot of (fair) comments that it wasn’t really $25, because I didn’t include the costs of things I already had.
For this, I’ll do a real budget breakdown. If you actually wanted to use these as business cards, how much would it actually cost to get a bunch of these made?
I was surprised that Digikey ran out of the display connectors I used. I picked a replacement but I haven’t actually tested it.
For the complete BOM check github, but here’s the simplified breakdown:
- Passives: $6.18
- IC’s: $6.23
- Connectors: $4.15
- Screen: $15.00
- PCB: $1.28
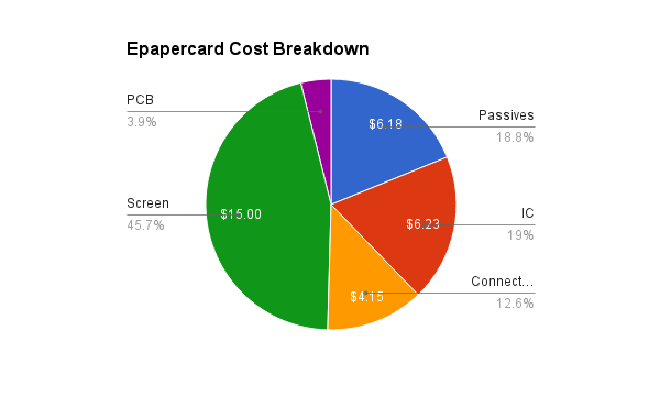
I haven’t looked at all the bulk pricing on digi-key, so those are the prices for one board, with the PCB from Elecrow. Digikey prices do not include shipping, but they will make you ship UPS/FedEx if you order the batteries through them.
That makes the total $31.59 for one card.
Let’s compare that to some alternatives.
FedEx sells a variety of business cards. The cheapest is “1-2 Color”, $14.99 for 250, around $0.06 per card. The most expensive are “Luxury Weight”, $44.99 for 250, $0.18 per card. Even the most expensive paper business card costs 0.57% of my epaper business card.
Keeping the original design intent in mind, let’s say you switch jobs so often that you constantly find yourself ordering new business cards. Also, you only buy luxury weight cards. You would have to switch jobs 176 times to break even with one epaper card. I think by the time you got to your 177th job, you might have bigger things to worry about.
Are my cards the most impractical? Of course not. Pure Metal Cards makes cards out of gold and other metals. The cheapest stainless steel cards are $600 for 200 (0.3mm), which is $3 per card. Not bad, now you only need to switch jobs 11 times to break even.
Their most expensive cards are pure gold, of course.
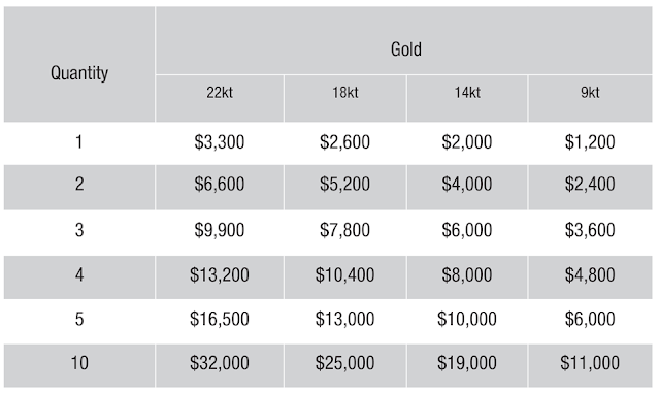
Now we’re talking. The cheapest gold business card is $1,200. My epaper card costs just 2.63% of their cheapest gold card, and only 0.96% of their most expensive one! If you’re in the market for gold business cards, feel free to contact me instead.
FAQ #
- How much for a color screen?
- Although Pervasive Displays announced three-color screens (black, white, and red), I can’t actually find them for sale anywhere. RGB screens don’t exist commercially.
- How about an Arduino design? How about an SD card?
- WyoLum’s BADGEr is such a good Arduino design with SD card, if I was going to do that I would just fork it and make it a bit smaller.
- Internal timing displays?
- Pervasive Displays does make a different line of displays with internal timing controllers, like the E2215CS062. These do have a simpler schematic, and only a 26-pin connector. If I were starting over, I would probably switch to one of those displays.
- I want to mess around with epaper, what should I buy?
- I haven’t tried it, but the PaPiRus Zero is a very cheap epaper hat for the raspberry pi.
- Pervasive Displays also has a page of kits on their website.
- Bigger displays?
- I tried to modify the libraries to make room for the 2.71" display images on the MSP430G2553. I managed to get it down to just 400 bytes too big for the G2553.
- It’s easy to buy $14 6" displays on AliExpress, but interfacing with them is harder because of poor documentation. Would be cool to get working though.
- I want to make my own!
- You can order the most recent version of the board from OSH Park, and find the rest of the files on Github. Although I suspect you may want to download KiCad so you can change the name on the front.
- If you just want a PCB with a blank front, I’ve created another project on OSH Park.
- You’re looking for work?
- Not anymore, thanks!
- I’m rich and want to buy 10,000 of these.
- (I’ll be honest, this isn’t a frequently asked question.)
- Please contact me! Or just make your own, this is open source hardware and software. It would be cool if you let me know though.
Comments: #
Nice work, and a great reference! #
Unknown -
Nice work, and a great reference!
#### Very nice design. Has me wondering if it could be ... [Galane](https://www.blogger.com/profile/08348363368939269094 "noreply@blogger.com") -
Very nice design. Has me wondering if it could be made thinner by using vias to put the display connector on the front side and cut a hole through the board to set the battery into, with a strip of metal across the front for one of the power contacts. Since it’d have to be two sided to put the display connector on the front, may as well use the front copper for other things such as a power connection and an LED.
#### hmm, there's gotta be a way to market this. ma... [Jamie L. Bartlett](https://www.blogger.com/profile/01072260479548031566 "noreply@blogger.com") -
hmm, there’s gotta be a way to market this. maybe a kit?
#### I was looking into the battery strip style. This E... [Paul Schow](https://www.blogger.com/profile/02139879554145337777 "noreply@blogger.com") -
I was looking into the battery strip style. This EKG business card does it very well http://mobilecg.hu/blog.html